My next furniture project is (subject to spousal approval) a sightscreen for our over-curious 2 month old so he can get some sleep.
The plan is simple.
2 x 800 x 2050 interior door panels joined with hinges, sitting up on castors, and with bench brackets at top and bottom to keep it in a range of 45 - 135 degrees (so it will be difficult to knock over).
Then paint the whole thing with IdeaPaint. That way we can write little notes like 'last fed: ', 'sleep began: ' and when he's a little bigger, he can draw on it.
Showing posts with label Furniture. Show all posts
Showing posts with label Furniture. Show all posts
Monday, September 26, 2011

The Bench II
Here are some photos after a quick coat of poly.


I am quite pleased with the proportions. Probably should have used a waterbased poly though - the transfers look a little damaged. Hopefully a couple more coats will cover the unevenness that has shown up.
Thursday, September 8, 2011
The Tattooed Bench
I had an interestingly shaped offcut from the manufacture of the desktertainment unit - a long panel (say 1400mm x 280mm). And I perceived a need to get a serviceable coffee table / piano stool for the lounge room. (With only three rooms, furniture should all be multipurpose - the sofa is not a viable bed and long-term should be replaced with something dual purpose. But I'm getting ahead of myself.)
My wife once received a thank-you note from a friend with a beautiful hand-drawn curlicue pattern. I thought it was too good to waste on a disposable card, and resolved to find a way to use it as decoration.
The result I call 'The Supportive Friend Bench'. It needs some finishing with polyurethane (always use a roller to paint furniture, btw. I found that out from the internet and it is Gold, Jerry, Gold, although some of the closeup paintwork on the frame might have you wondering.) This photo shows the pattern, and one of its repetitions. The Bench's best feature is its overall proportions and simple elegance, which I don't have a photo of yet. I will add it to this post when I can take one.

Wednesday, July 6, 2011
The First Desktertainment Unit is Away!
Since the earliest times, Man has dreamed of a thing with a sloped surface to put things on and in. Note St Francis' early example of the type.

I am please to report that the desktertainment unit has reached initial operating capability.


This below is a bit of ikea hacking: a vika alex with a 40mm hole in the back and two extension leads into the top two drawers. The two laptop chargers live in the drawers, with the laptops when not in use.

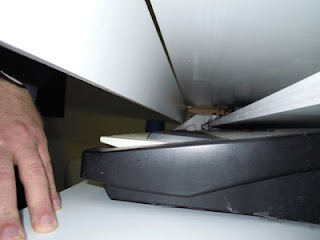
Below is a photo with the camera handle flopping into it, and over-exposed to billy-oh: it is intended to show that if you cut an inch out of your standard drawer runner with a hacksaw, you can get a 'slide and then hinge' action for under $10 - a manufactured hinge to do the same thing is more like $50.

The gap at the top is larger than I would have wanted, but it looks less gaping across the room.

The underside showing the cutout.

I have turned the cutout into a funky bench / coffee table / seat. But that is for another day.
I am please to report that the desktertainment unit has reached initial operating capability.


This below is a bit of ikea hacking: a vika alex with a 40mm hole in the back and two extension leads into the top two drawers. The two laptop chargers live in the drawers, with the laptops when not in use.


Below is a photo with the camera handle flopping into it, and over-exposed to billy-oh: it is intended to show that if you cut an inch out of your standard drawer runner with a hacksaw, you can get a 'slide and then hinge' action for under $10 - a manufactured hinge to do the same thing is more like $50.

The gap at the top is larger than I would have wanted, but it looks less gaping across the room.

The underside showing the cutout.

I have turned the cutout into a funky bench / coffee table / seat. But that is for another day.
Tuesday, June 21, 2011
The Desktertainment Unit Takes (some) Shape
The Desktertainment Unit is coming together very nicely. Here we see the fixed frame. Things measured up OK, but I was a little optimistic in predrilling too many of the holes in the end pieces. It was helpful to have one drilled each end, but unhelpful to have the rest drilled, because they were imperfectly aligned. Fortunately pine is forgiving and soft. The little workbench in this photo cost just $25 at Bunnings. Crazy talk.

Here's the lid on, and the shelves in. Resting on our Klippan.

Here, the lower desktop is slid out to show it off.

No shelf.

Shelf.

The observant will not that this is not quite according to plan yet. The lid needs to be cut down by about 10cm and a front-piece attached. It requires a ~1.760m straight line cut. That's a long way, even for a man of science*

Lid open, keyboard in place. Keyboard only just fits below shelf. One centimeter in it! Less than I expected.

Wife acceptance factor quite low. The desktertainment unit displaces cookbooks and DVDs, and we have a baby due veeeery soon, so this further messing for no immediate benefit is a nightmare. But my wife is awesome, and has tolerated my descent into bespoke-furniture-madness with remarkable, more than remarkable, calm.
* Honey I Shrunk the Kids reference.
Monday, June 13, 2011
An actually existing Desktertainment unit?
Yes, the time has come for the Desktertainment unit to move out of the world of ideal forms and condense into crude perishable matter.
Measuring up:

Cut parts, with primer coat:

So far, I have learned it is best to steer your jigsaw, rather than attempt to push it on track with a guide - the blades cut straight ahead vastly better than they do sideways, and so the end result of using a guide is that the blade bends and cuts at an angle to the wood instead of straight through, so that the saw body can track along the guide while the blade cuts straight ahead. Steering means you can end up with a somewhat wiggly vertical cut through your panel, but it's much better than putting a twist from vertical to 45 degree chamfered. Probably not safe either, running the blade so distorted.
Measuring up:


So far, I have learned it is best to steer your jigsaw, rather than attempt to push it on track with a guide - the blades cut straight ahead vastly better than they do sideways, and so the end result of using a guide is that the blade bends and cuts at an angle to the wood instead of straight through, so that the saw body can track along the guide while the blade cuts straight ahead. Steering means you can end up with a somewhat wiggly vertical cut through your panel, but it's much better than putting a twist from vertical to 45 degree chamfered. Probably not safe either, running the blade so distorted.
Sunday, May 15, 2011
The Desktertainment Proposal
Secretary Desk Unit
This is designed simply and is intended to be simple to construct, and to use inexpensive materials. I estimate I can make it (badly) myself for around $1000, including purchasing some tools.
I intend to put some electronic music equipment on the top ‘drawer’ and leave the bottom drawer as bare workspace. It is used either as a desk with a laptop on the sloped surface, or, with the sloped surface raised, as a music workstation. When not being used, it sits in the living room and is acceptable to my wife.
The component pieces are:
A base of 1800 x 450mm.
Two symmetrical end walls, 450 base x 230 height, with a large triangular truncation from 60mm height on the front edge to 200mm from the back edge. This is about 124 degrees.
A two-part front panel joined at a long piano hinge.
o The upper part 1775 wide by290 deep.
o The lower part 1800 wide by 75 deep, mounted so as to be flush with the bottom of the base, protruding slightly above the line of the upper part.
Two desk-surfaces mounted as drawers, able to slide out for use as workspace (loaded with about 10kg, so fairly strong drawer slides would be preferable). These are 1770 (allowing 10mm for each end wall and 5mm for each drawer slide etc) x 410 deep.
A 110mm deep fixed internal shelf mounted on the back wall 80mm from the inside top.
A back structure with two long windows (for power cords) one above and one below the fixed internal shelf. Overall 240 x 1800, but this could be made from parts.
Materials:
Inexpensive real wood – probably Pine? This is a prototype more than an heirloom.
The design was drawn using a standard 10mm thickness, which was probably a mistake. It will be workable with material up to 20mm thick.
Joinery:
This plan makes no real allowances for joinery. I have assumed that dowels, nails and screws can be used that require no additional volume (e.g. corner bracing). It is box shaped, so as long as the material is stiff enough, it should be reasonably strong.
Finish:
a translucent white (blue-grey tint) wash which is matt and allows some of the wood grain pattern to be seen. This would match some existing furniture. If not, I can paint it a basic white myself.
Chamfering: either none, or simple 2x2mm 45 degree chamfer.
Variations:
Given the low budget, changes to use standard cuts of wood are desirable.
Any stupidity on my part should be corrected.
In situ on filing cabinets / Ikea Alex drawer units. With home entertainment center. An earlier version with a three-part front panel. A good piano-stool / coffee table combo is needed.

This view shows the cutaway and the kit slid out for use.

Ahh, detailed drawings. These are from a second version of the model. The lid is in the 'open position'.

Back view, showing windows for power cords etc:

This rather confusing image shows an endwall foregrounded for some dimensions. There are better images further on.

The lid has simple studs at each end which run in the track at the top of the endwall:


Front view with front panel raised.
Some of the dimensions are slightly out, probably because I picked off the wrong point. 229.8 should be 230. 79.8 should be 80, etc. I'm hoping that when downloaded, this detail is regained.
This is designed simply and is intended to be simple to construct, and to use inexpensive materials. I estimate I can make it (badly) myself for around $1000, including purchasing some tools.
I intend to put some electronic music equipment on the top ‘drawer’ and leave the bottom drawer as bare workspace. It is used either as a desk with a laptop on the sloped surface, or, with the sloped surface raised, as a music workstation. When not being used, it sits in the living room and is acceptable to my wife.
The component pieces are:
A base of 1800 x 450mm.
Two symmetrical end walls, 450 base x 230 height, with a large triangular truncation from 60mm height on the front edge to 200mm from the back edge. This is about 124 degrees.
A two-part front panel joined at a long piano hinge.
o The upper part 1775 wide by290 deep.
o The lower part 1800 wide by 75 deep, mounted so as to be flush with the bottom of the base, protruding slightly above the line of the upper part.
Two desk-surfaces mounted as drawers, able to slide out for use as workspace (loaded with about 10kg, so fairly strong drawer slides would be preferable). These are 1770 (allowing 10mm for each end wall and 5mm for each drawer slide etc) x 410 deep.
A 110mm deep fixed internal shelf mounted on the back wall 80mm from the inside top.
A back structure with two long windows (for power cords) one above and one below the fixed internal shelf. Overall 240 x 1800, but this could be made from parts.
Materials:
Inexpensive real wood – probably Pine? This is a prototype more than an heirloom.
The design was drawn using a standard 10mm thickness, which was probably a mistake. It will be workable with material up to 20mm thick.
Joinery:
This plan makes no real allowances for joinery. I have assumed that dowels, nails and screws can be used that require no additional volume (e.g. corner bracing). It is box shaped, so as long as the material is stiff enough, it should be reasonably strong.
Finish:
a translucent white (blue-grey tint) wash which is matt and allows some of the wood grain pattern to be seen. This would match some existing furniture. If not, I can paint it a basic white myself.
Chamfering: either none, or simple 2x2mm 45 degree chamfer.
Variations:
Given the low budget, changes to use standard cuts of wood are desirable.
Any stupidity on my part should be corrected.
In situ on filing cabinets / Ikea Alex drawer units. With home entertainment center. An earlier version with a three-part front panel. A good piano-stool / coffee table combo is needed.

This view shows the cutaway and the kit slid out for use.

Ahh, detailed drawings. These are from a second version of the model. The lid is in the 'open position'.

Back view, showing windows for power cords etc:

This rather confusing image shows an endwall foregrounded for some dimensions. There are better images further on.

The lid has simple studs at each end which run in the track at the top of the endwall:

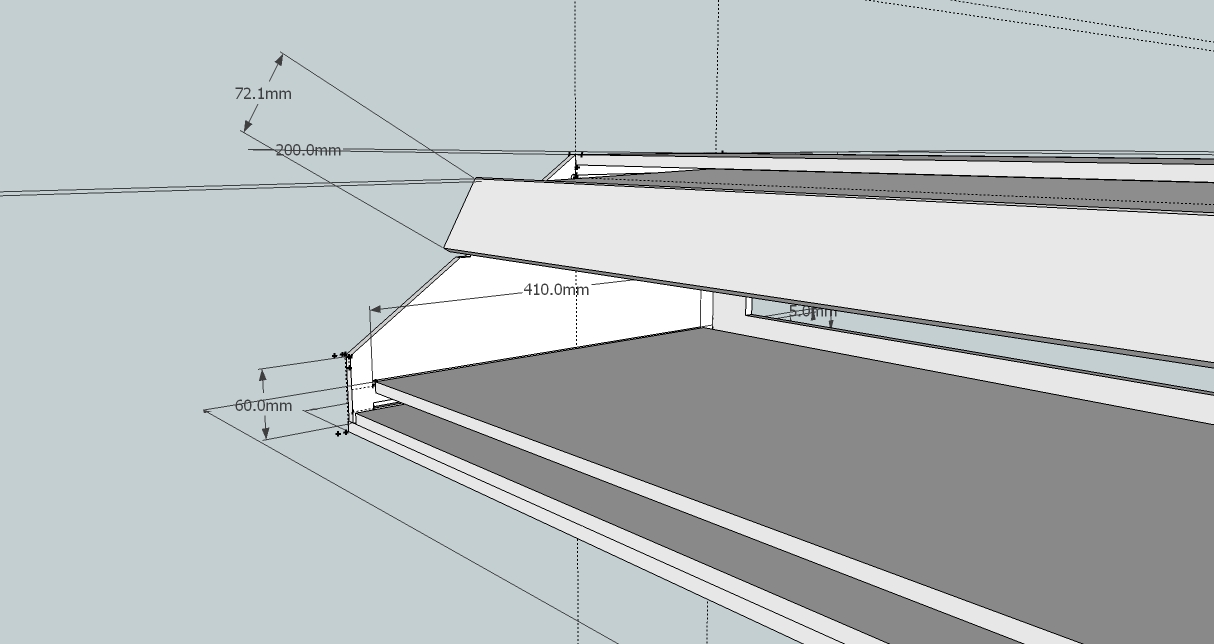
Front view with front panel raised.
Some of the dimensions are slightly out, probably because I picked off the wrong point. 229.8 should be 230. 79.8 should be 80, etc. I'm hoping that when downloaded, this detail is regained.
Monday, April 25, 2011
Sketchup is better, much better than I realised
Another plug for Google's Sketchup - it turns out that I was wrong about its limits. It is able to do very precise dimensioning. I should remember to check out instructions next time, before concluding this or that can't be done. Desktertainment V2 is on the way.
(New problems for it though - printer? charging post for phones etc?)
(New problems for it though - printer? charging post for phones etc?)
Subscribe to:
Posts (Atom)